The Si7021 is a digital humidity and temperature sensor that is widely used in Arduino projects where a simple, reliable I²C interface is preferred over analog sensing. It combines the sensing element, ADC, signal processing, and calibration data in one package, which makes it practical for weather stations, indoor climate monitoring, data loggers, and battery-powered environmental nodes.
This guide focuses on using the Si7021 with Arduino. It covers the sensor basics, wiring, library installation,
example code, and a full explanation of the commonly used public functions provided by the two most popular
Arduino libraries: Adafruit and SparkFun.
1. Si7021 Overview
| Parameter | Value |
|---|---|
| Sensor Type | Digital humidity and temperature sensor |
| Interface | I²C |
| Default I²C Address | 0x40 |
| Humidity Accuracy | ±3% RH |
| Temperature Accuracy | ±0.4 °C |
| Temperature Range | -40 °C to 85 °C |
| Calibration | Factory calibrated |
0x40. If you need multiple sensors
on the same I²C bus, you will need an I²C multiplexer or a different sensor family with selectable addresses.
2. Why Use Si7021 with Arduino?
The Si7021 is a good fit for Arduino because the setup is straightforward and the output is already calibrated. You do not need to handle analog voltage scaling, lookup tables, or manual compensation just to get basic humidity and temperature readings. In most projects, four wires are enough: power, ground, SDA, and SCL.
- Simple I²C wiring
- Good accuracy for general-purpose environmental monitoring
- Small code footprint
- Common support in Arduino libraries
- Suitable for low-power and portable systems
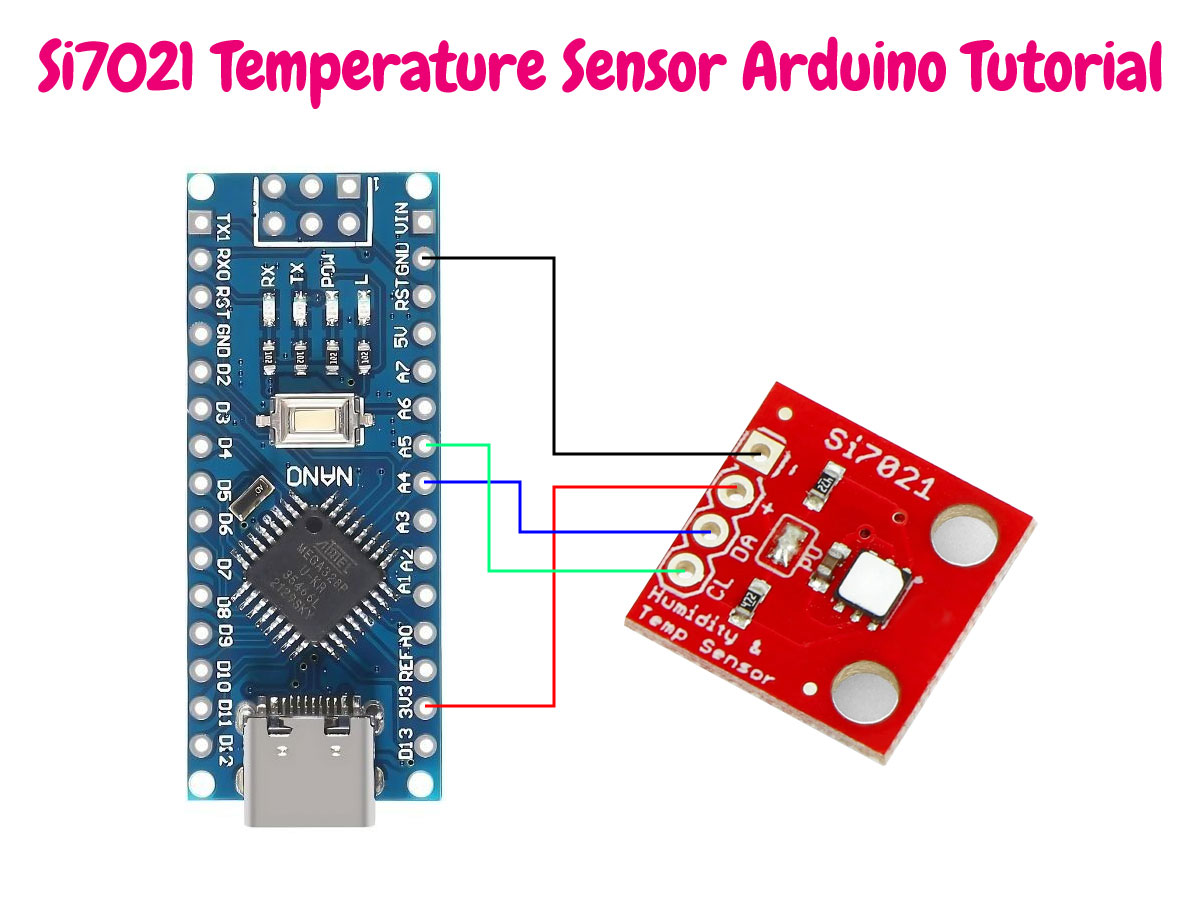
3. Wiring the Si7021 to Arduino
Most breakout boards expose VIN, GND, SDA, and SCL. Some boards
also include pull-up resistors and voltage regulation, but you should always check the breakout board schematic.
| Si7021 Pin | Arduino Uno | Arduino Mega | Arduino Leonardo / Micro |
|---|---|---|---|
| VIN / VCC | 3.3V or 5V depending on breakout | 3.3V or 5V depending on breakout | 3.3V or 5V depending on breakout |
| GND | GND | GND | GND |
| SDA | A4 | 20 | 2 |
| SCL | A5 | 21 | 3 |
4. Recommended Arduino Libraries
Two libraries are commonly used with Arduino projects:
-
Adafruit Si7021 Library
https://github.com/adafruit/Adafruit_Si7021 -
SparkFun Si7021 Arduino Library
https://github.com/sparkfun/SparkFun_Si7021_Arduino_Library
If you want the simplest path and a short API, the Adafruit library is usually enough. If you want more direct control
over heater current, measurement resolution, connectivity checks, and serial number access, the SparkFun library gives
you more control.
5. Installing the Libraries
Adafruit Library Installation
- Open the Arduino IDE.
- Go to
Sketch > Include Library > Manage Libraries... - Search for
Adafruit Si7021 Library. - Install it.
- Install any dependency the IDE asks for.
SparkFun Library Installation
- Open the Arduino IDE.
- Go to
Sketch > Include Library > Manage Libraries... - Search for
SparkFun Si7021. - Install the library.
6. Basic Arduino Example (Adafruit Library)
#include <Wire.h>
#include "Adafruit_Si7021.h"

Adafruit_Si7021 sensor = Adafruit_Si7021();

void setup() {
  Serial.begin(115200);
  while (!Serial) {}

  if (!sensor.begin()) {
    Serial.println("Si7021 not found. Check wiring.");
    while (1) delay(10);
  }

  Serial.println("Si7021 ready.");
}

void loop() {
  float humidity = sensor.readHumidity();
  float temperatureC = sensor.readTemperature();

  Serial.print("Humidity: ");
  Serial.print(humidity);
  Serial.println(" %RH");

  Serial.print("Temperature: ");
  Serial.print(temperatureC);
  Serial.println(" C");

  delay(2000);
}
7. Public Functions in the Adafruit Si7021 Library
The Adafruit library keeps the API short and focused. Below is a practical explanation of the public methods and fields.
| Function / Field | Purpose | Notes | Example Usage |
|---|---|---|---|
Adafruit_Si7021(TwoWire *theWire = &Wire) |
Creates the sensor object. | Useful for selecting a different I²C bus. | Adafruit_Si7021 sensor = Adafruit_Si7021(); |
bool begin() |
Initializes the sensor and verifies communication. | Call once in setup(). |
                        if (!sensor.begin()) {
                        Serial.println("Sensor not found!");
                        }
|
float readHumidity() |
Reads humidity in %RH. | Returns float value. |
                        float h = sensor.readHumidity();
                        Serial.println(h); // Example: 45.3
|
float readTemperature() |
Reads temperature in °C. | Returns float value. |
                        float t = sensor.readTemperature();
                        Serial.println(t); // Example: 23.7
|
void reset() |
Sends a software reset command. | Useful for recovery. |
                        sensor.reset();
                        delay(500);
|
void readSerialNumber() |
Reads and stores the serial number. | Stored in sernum_a and sernum_b. |
                        sensor.readSerialNumber();
                        Serial.print(sensor.sernum_a);
                        Serial.print(" ");
                        Serial.println(sensor.sernum_b);
|
void heater(bool h) |
Enable/disable heater. | Helps reduce condensation. |
                        sensor.heater(true); // Turn ON
                        delay(1000);
                        sensor.heater(false); // Turn OFF
|
bool isHeaterEnabled() |
Returns heater status. | True if active. |
                        if (sensor.isHeaterEnabled()) {
                        Serial.println("Heater ON");
                        }
|
void setHeatLevel(uint8_t level) |
Sets heater intensity. | Use defined levels. |
sensor.setHeatLevel(3); // Medium level
|
uint8_t getRevision() |
Returns firmware revision. | Mainly for diagnostics. |
                        uint8_t rev = sensor.getRevision();
                        Serial.println(rev); // Example: 20
|
si_sensorType getModel() |
Returns sensor model. | Identifies chip type. |
                        si_sensorType model = sensor.getModel();
                        Serial.println(model); // Example: SI_7021
|
uint32_t sernum_a |
First part of serial number. | Read-only field. |
Serial.println(sensor.sernum_a); // Example: 12345678
|
uint32_t sernum_b |
Second part of serial number. | Read-only field. |
Serial.println(sensor.sernum_b); // Example: 87654321
|
Adafruit Heater Levels
The Adafruit library defines named heater levels such as lowest, low, medium, high, higher, and highest.
In practice, the heater is mostly useful for reducing condensation or helping the sensor recover in very humid conditions.
It is not intended to work as a general-purpose heating element.
8. Public Functions in the SparkFun Si7021 Library
The SparkFun library exposes a larger API and is often more convenient if you want to inspect the device state in more detail.
| Function | Purpose | Notes |
|---|---|---|
bool begin(TwoWire &wirePort = Wire) |
Initializes the library and validates that the detected device matches Si7021. | Returns true on success. |
bool isConnected() |
Checks whether the sensor acknowledges on the I²C bus. | Useful for wiring checks and runtime diagnostics. |
float getRH() |
Returns humidity in %RH. | Simple read function without status output. |
bool getRH(float *humidity) |
Reads humidity and writes the result to a variable. | Returns success/failure so you can detect communication issues. |
float getTemperature() |
Returns temperature in °C. | Simple direct getter. |
bool getTemperature(float *temperature) |
Reads temperature in °C and stores it via pointer. | Useful when you also want a success flag. |
float getTemperatureF() |
Returns temperature in °F. | Convenient for imperial-unit projects. |
bool getTemperatureF(float *temperatureF) |
Reads temperature in °F and stores it via pointer. | Returns success/failure. |
float getPreviousTemperature() |
Reads the previous temperature value associated with the last humidity measurement. | Useful when you want the temperature value tied to a humidity conversion sequence. |
float getPreviousTemperatureF() |
Same as above, in °F. | Imperial-unit version. |
float readTemp() |
Deprecated alias for previous temperature in °C. | Avoid in new code. |
float readTempF() |
Deprecated alias for previous temperature in °F. | Avoid in new code. |
float getTemp() |
Deprecated alias for current temperature in °C. | Avoid in new code. |
float getTempF() |
Deprecated alias for current temperature in °F. | Avoid in new code. |
void heaterOn() |
Turns the heater on. | Shortcut for setHeater(true). |
void heaterOff() |
Turns the heater off. | Shortcut for setHeater(false). |
void setHeater(bool heaterOn) |
Explicit heater control. | Use for predictable state handling. |
bool getHeater() |
Reads the current heater enable state. | Returns true if enabled. |
void setHeaterCurrent(uint8_t currentLevel) |
Sets heater current level. | Lower 4 bits are used. Higher values increase heating and current draw. |
uint8_t getHeaterCurrent() |
Returns the current heater setting. | Useful for diagnostics and configuration display. |
void setResolution(uint8_t resolutionValue) |
Changes measurement resolution. | Trade-off between precision and conversion time. |
uint8_t getResolution() |
Returns the current measurement resolution setting. | Returns values from 0 to 3. |
void changeResolution(uint8_t resolutionValue) |
Deprecated alias for setResolution(). |
Avoid in new code. |
void reset() |
Sends a software reset command. | Useful after bus errors or startup issues. |
uint64_t getSerialNumber() |
Reads the 64-bit serial number. | Useful when you need per-device identification. |
uint8_t getDeviceID() |
Returns the device ID byte. | Should report 0x15 for Si7021. |
uint8_t checkID() |
Deprecated alias related to device ID checking. | Avoid in new code. |
SparkFun Resolution Settings
| Resolution Value | Humidity Resolution | Temperature Resolution |
|---|---|---|
0 |
12-bit | 14-bit |
1 |
8-bit | 12-bit |
2 |
10-bit | 13-bit |
3 |
11-bit | 11-bit |
9. Example Using the SparkFun Library
#include <Wire.h>
#include "SparkFun_Si7021_Breakout_Library.h"

SI7021 sensor;

void setup() {
  Serial.begin(115200);
  Wire.begin();

  if (!sensor.begin()) {
    Serial.println("Si7021 not detected.");
    while (1) delay(10);
  }

  sensor.setResolution(0);      // Default: RH 12-bit, Temp 14-bit
  sensor.setHeater(false);      // Keep heater off for normal measurements
  Serial.println("Si7021 ready.");
}

void loop() {
  float rh = sensor.getRH();
  float tempC = sensor.getTemperature();
  float tempF = sensor.getTemperatureF();

  Serial.print("Humidity: ");
  Serial.print(rh);
  Serial.println(" %RH");

  Serial.print("Temperature: ");
  Serial.print(tempC);
  Serial.print(" C / ");
  Serial.print(tempF);
  Serial.println(" F");

  delay(2000);
}
10. Best Practices for Reliable Measurements
- Do not place the sensor too close to voltage regulators, linear drivers, or other warm components.
- Avoid touching the sensing area directly during installation.
- Do not sample faster than the application really needs.
- Keep the heater off unless you have a specific reason to use it.
- For enclosure-based designs, make sure airflow to the sensor is not blocked.
- Use short I²C wiring where possible, especially on breadboards.
11. Common Problems and Fixes
Sensor Not Detected
- Check SDA and SCL wiring.
- Confirm common ground.
- Run an I²C scanner and verify that the device appears at
0x40. - Make sure your breakout board is powered correctly.
Readings Drift Upward in Temperature
- The sensor may be too close to a warm MCU, USB regulator, or enclosure hot spot.
- Move the sensor away from heat sources or reduce board self-heating.
Humidity Values Look Wrong
- Condensation or contamination may affect the sensor.
- Give the sensor time to stabilize after handling.
- Do not leave the heater enabled during normal measurement unless required by the use case.
12. Which Library Should You Choose?
| Need | Recommended Library |
|---|---|
| Simple setup and short API | Adafruit |
| Access to heater current and resolution control | SparkFun |
| Quick beginner projects | Adafruit |
| More low-level control and diagnostics | SparkFun |
13. Summerize
The Si7021 remains a practical sensor for Arduino-based environmental measurement when you want a compact, calibrated digital sensor with a very simple interface. For most projects, either of the two main Arduino libraries will be enough. The Adafruit library is a good choice when you want cleaner code and a minimal API. The SparkFun library is the better option when you need more control over heater settings, resolution, and device-level status.
If the project goal is straightforward indoor temperature and humidity logging, the setup can be kept very simple. If the project involves moisture-heavy environments, battery optimization, or tighter diagnostics, it is worth taking advantage of the extra functions exposed by the SparkFun implementation.